Thursday, July 29, 2010

Creating a realistic spider web on a quilt

When I got one of the last quiltlets in my RR exchange, it was a Halloween theme and it was my turn to embellish something. I tried to find cute Halloween buttons, but it's not quite time for them to be out in the stores yet.  My mind kept going back to that spider and I thought she needed a web. After a lot of experimenting, I think I came up with something that worked out halfway well. I just hope the owner likes it!
After a few tries and mishaps, here is what I ended up doing:
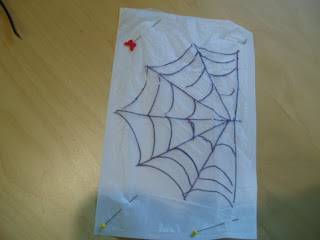
I drew out a spider web to the size I wanted on Paper Solvy by Sulky. (it's a washaway paper--unlike the copy paper I tried earlier!).  Then I pinned on Super  Solvy by Sulky (it looks a bit like a thin vinyl, but completely washes out) over the Paper Solvy.


Then to provide a bit of stablization for the web 'threads', I quilted a grid back and forth over the design area. I should have used a different color so you could see it better, but that would have meant making more than I already did! Don't forget this step or your web will be so hard to handle, it isn't even funny! Ask me how I know! ;)


For the next step, I used 12 weight Sulky thread (you could use a heavy top stitch thread as well), an embroidery needle (size 16), and a triple stitch (sometimes called a 'jean stitch' on your machine. It takes one stitch, goes back one and then a second forward stitch, putting 3 stitches in one place).  I stitched on all my Sharpie lines.


Blurry picture, but it was the best one of the ones I took. But you get the idea. Now the fun part!  Go to the kitchen sink and start running water on the web and like magic the paper and solvy disappear!


It ends up being a gooey mess, but keep on rinsing until all of the 'goop' is gone.


Actually I left a TINY bit in to give the web just a bit of body.  But just a little.


 I laid it out to dry, spreading all the webs out nice and flat.


Once it's dry (okay, I'll fess up..I couldn't wait that long, so towel dried it the best I could!), lay it on your quilt, and using a small zig zag stitch, secure it down in several spots. I didn't go over all the webs, I just tacked it down. I wanted a bit of a 3D look. After it was all tacked down, I went and cut out the 'grid' portions that help hold it together temporarily. 


And voila! She's done and now has a home to hide in!


Looks a little rickety..but hey, spider webs in real life aren't perfect either. 

Tuesday, July 27, 2010

Round Robin quilt arrives home!


After 15 months of traveling everywhere from Israel to England to all over the US, my little quiltlet has arrived safe and sound.  I think all the gals did such a wonderful job! Thanks to the RR bloggers who participated.

Round one was started by me, it's the diagonal scrappy stripe block in the upper left hand corner. It set the stage of what I wanted on my quilt.  I want bright, fun colors and my theme was "Fun in the Sun".  Every round was to be a specific size and then when the quiltlet was done, we had to embroider on them, add appliques, write on it and add embellishments and quilt it.


I loved the little flip flops that someone embroidered....

then someone added a bunch of bright squares and others appliqued some 'beachy' type things on there as well.

I'm thinking it will be perfect in my home in SC!  Thanks again to the RR bloggers for their great work!

Thursday, July 15, 2010

File Cabinet Redo

I'm being overcome by paper...patterns, magazines, articles from the internet and there are piles everywhere in my studio!  When a good friend was having a garage sale and said that at the end of the day everything goes to Goodwill, I did my best to support her and relieve her of having to haul so much to Goodwill. Hey, that's what friends are for, right?  LOL  One of the things I took off her hands was a legal size file cabinet, in pretty good condition, but quite frankly...ho hum, boring, bland. Never mind that I had a matching one, but I paid full price for it and hate to ruin it by painting it. But this free one....I felt fully comfortable letting my imagination run wild! Enter my favorite color...at the moment...
I didn't take a before picture, but I am fairly confident you can imagine what a plain, beige 4 drawer file cabinet looks like, right?  I then taped off all the metal...dumb!  I had to later remove it to get the paper on the drawer fronts and then decided to paint the hardware anyway. 


But oh well.  It took 2 cans (after priming it) to fully cover it.  I thought it was a lot, but since this is a fairly new thing for me, it could be right. 
After it was all dry, I then removed all the hardware.  A lot of the access to the handles, etc. was hidden behind a plastic insert on the inside drawer front, which I removed. 


Picking out the wildest scrapbook paper I could find, I soon realized this was a LEGAL size file cabinet and one 12" x 12" scrapbook paper wasn't going to fit! 


 The outside drawer dimension was 
11 1/4" x 16 1/2". So I cut a second sheet of paper and cut it about 2" less wide than I needed, and then filled it with a contrasting band of color. 


In order to play around with my design, without committing to it, I used this Spray Adhesive, which allows you to reposition your paper, without ruining it.

After I was satisfied with my paper placement...


I used Mod Podge to glue the papers on the drawers and then put a thin coating on top of it, making sure I sealed the edges well so they wouldn't peel.  I don't have ONE picture of this step..do you know how hard it is to do Mod Podge AND take a photo at the same time?  When you are by yourself, it's hard to do!  But you can read more about it at Mod Podge Rocks blog. (great fun blog, btw!)
I decided that my hardware kind of blended in with this wild paper, so decided to spray paint the hardware black. 


and here she is...in all her wild glory!


Wow--now that I look at this picture, it looks like a wedge!  Obviously the angle that I had to take it!  
Now I'm off to gather the patterns, papers, etc. that are stashed ALL over the place and get them into ONE place.  
My husband thinks I'm crazy...but it makes me smile.  And that, my friends, is what it's about. Bringing some JOY in my life.