HOLIDAY PLACEMAT PURSE

I made a bunch of these purses for gifts and thought I'd share it with you too. I'd send y'all one, but the postage would be a bit much, so....grab a cuppa, a red placemat, fur trim and make one yourself..or two...or three!
Supply List:

(1) Placemat- mine was from Wal-Mart and had a bit of metallic sheen. It was 13" x 19", but yours can be whatever size it comes!
(2) 2" x 13" fur trim pieces (if your placemat is not 13"...adjust your fur trim to match your placemat size--it's the side measurement)
(2) 1" x 12" black grosgrain ribbon pieces
(1) 1" x 1 1/2" velcro
red thread
Steps:
Remove any tags from placemat.
 Working on the wrong side of the placemat, center the 'soft' (loop) side of the velcro piece on one SIDE of the placemat,(the short side) just below the hem (about 1/4" down). Stitch in place.
Repeat for other part of the velcro (hook), making sure the two pieces line up when you fold your placemat in half.
 Fold under 1/4" on both short ends of BOTH grosgrain ribbon pieces. Working on the wrong side of the placemat, pin one side of the ribbon (folded edge down) onto the side of the placemat, (it will be close to the velcro) about 4" from the long edge and pin the other side 4" from the other long edge to create a handle.
Repeat for other ribbon, making sure they line up when the placemat is folded in half. Stitch in
place. (they don't need to be backstitched, as they will get stitched down again when you attach the fur trim.
 Working on the RIGHT side of the placemat now, lay one fur trim piece along a side edge. Pin it so the fur trim is right at the edge.
 Repeat for other side.
 Zig zag along edge of fur trim, gently moving the fur out of the way to stitch. (at this point I had white thread in the top and red thread in the bobbin so the stitches would not show.)
Zig zag along the bottom edge of the fur trim piece, again moving the fur out of the way.

Fold the placemat in half, wrong sides together and pin. Stitch with 1/2" seam, backstitching at the top edge to secure.
To
 make a box corner: Place your ruler 1" from the bottom folded edge and 1" from the SEAM LINE (so the ruler will actually be at the 1 1/2" mark on the edge of the placemat).
Cut a
 corner out, being very careful to not 'overshoot' the ruler and cut into the placemat. Repeat on other bottom corner. Remember the 1" mark needs to be on the SEAM LINE and the FOLDED edge.
 Match the seam line (with the seam allowances opened) with the bottom fold and pin.
 Stitch with 1/2" seam, back stitching at the beginning and the end.
 Zig zag the raw edges to prevent raveling.
Turn the purse inside out and now admire!
 Great job!!
Alternatives:
* You can use pre-purchased handles from JoAnn's, Michael's or Hobby Lobby instead of the grosgrain ribbon.
* Use beaded trim instead of fur for a bit of fun.
*Using a plain placemat, fill the right side with different strips of ribbon for a striped look.
Here is the basic order for making a purse from a placemat:
1. Attach velcro on the wrong side of the placemat, centered at the short sides of the placemat (which will end up being the top of the purse).
2. Attach handles of your choice.
3. Attach any trim you'd like on the top edge of the purse (or none at all).
4. Fold placemat in half, wrong sides together and stitch side seams with 1/2" seam.
5. Box the corners. The bigger square that you cut, the wider your bottom will be (and therefore your purse will be shorter). Just remember that you cutting your square, using the bottom fold edge and the side SEAM allowance for your measurement marks.
The sky's the limit on what you can do. I bet you look at placemats a whole lot differently from now on! And just wait to see what you can do with 3 placemats! (more to come.........)



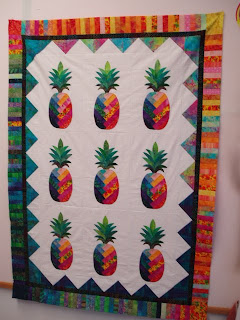 I finally finished the Bali Pineapple..little piano key border took a while! And it didn't even come close to making a dent in the stash! I think I might make up some kits--good for me to reduce the stash--good for them to get a nice variety of batiks, right?
 They are just too simple...buy 3 placemats..all the same size...add webbing for handles to two of them. Then add the 3rd placemat in between the two, sew into one long piece. Fold in half, sew up the side seams, box the corners and you are done! NO raw edges anywhere (although I do zigzag the boxed corners). They make great sturdy totes in less than half hour! And then made a few of these placemat purses for gifts...
 I just took one placemat that had all that pretty ribbon trim, added tabs for handles and velcro to hold it closed, sewed up the sides, boxed the corners and Voila! ....a purse! and the last thing I've been working on is a quilt for my in laws for Christmas. She's been asking for one for their bed now and then. I'm making these blocks scrappy, using 1/8 yard (FROM STASH) of 20 different fabrics that was in the line.
  What you aren't seeing is the block next to it that is a plain block with a small border around it. I had everyone in the family trace their handprints onto freezer paper at Thanksgiving. I originally intended to fuse their handprints onto the blank blocks and set them alternately with the pieced blocks, but I decided that it would look too much like a little kids quilt rather than a nice quilt for a bed. So, I'm going to hand embroider the outline of their hands in a soft color and their names for a more subtle look to it. You'll be able to see them, but up close. I wish I knew of a way to do it on machine and I might practice this weekend. Time is running short and hubby and I are running away to some warm sun from Dec. 15 to 22, so I basically have next week to finish it! And I need to make 12 more pieced blocks and ALL the embroidered blocks, teach one more class, attend two meetings, two children's Christmas programs and watch all 5 grandkids Sat/Sun next week. I see some 3 AM sewing sessions in my near future!



 Posts
Posts