Thursday, April 14, 2011

T-shirt quilt for softball player

I just finished another T-shirt quilt for a softball player...

It's funny, I do several of these a year for people (mostly softball players--hmmm, imagine that?) and I end up using the same color for sashing in almost 80% of them.  

Here is my choice of colors:

{Hot Pink}   {Red}   {Royal Blue}   {Bright Yellow}  {Almost Lime Green}


{Pink}  just didn't work for me.  Not enough of it in the quilt?
{Red} might have been okay if it would have been brighter, but that didn't thrill me either.
{Royal Blue} Okay, I admit. My 'go to' color.  It seems to recede into the background without clashing with any of the shirts and allows the T-shirts to come out and shine. 
{Bright Yellow} Got your shades?  Whoa--I'm the first one to admit I love bright, intense colors, but it was trying to take all the glory when it forgets it is all about the T-shirts! Sorry yellow, I really wanted you.
{Almost Lime Green} it was the 'almost' that got me.  It just didn't quite get it with the other lime greens in the quilt. 

So, Royal Blue again makes it's appearance in my T-shirt quilts. It just seems to be the most unassuming choice and allows the shirts to stand out. 


I use a heavy flannel for my sashing and backing. First of all because it is more the weight of the T-shirts and it makes it a nice snuggly quilt.  I use Warm and Natural cotton batting.  I quilt it with a gray thread in a large-ish overall meander.  It's not about the quilting here..it's all about the shirts. 


This young lady had a number of shirts that had designs on the back, including several that had the names of participants. So I just chose a few and added a row on the back. 


I have seen several awesome Tshirt quilts, but this is the most basic one that I teach and also do for hire, as it's the most economical.   I'm working on a tutorial now.  

This is a great shirt...thought I would share it...guess who is a catcher? 

Wednesday, April 13, 2011

Happy 1st Birthday to my last granddaughter

What a dear little girl she is....and the most beautiful eyes.  And she just takes it all in with a smile with 2 little teeth...Happy Birthday Precious Little One..
Wouldn't it have been nice to have the actual photo instead of taking a photo of a photo?  :)  Getting photos from my daughters is like pulling teeth sometimes!  And they don't even have to go to the camera shop, turn in a negative, order a print and wait a week!  So I do the next best thing..take a picture of a picture!  I should have just taken it off the wall. heehee


Nana is making her some headbands and clips, I can't believe how long her hair is!  Sad to say, it's longer than her sister's, who is 3 1/2 and decided that cutting your hair is fun! But that's another story!

PS..I love that you can Photoshop 'food off face' rather easily! just sayin'....

Saturday, April 09, 2011

Portable Ironing Table Tutorial

I have made several of these already and wonder why I didn't do more sooner? 


 They are SO handy to have by your side when you are sewing and it doesn't take away precious space on your sewing table. PLUS, it GIVES you extra space if you need it.


  If I don't necessarily need an iron at my side on a particular day, I put my small cutting mat on it.  Or just to have more space. Period.

This is embarrassingly simple.  It takes about 5 minutes to do. It will take you longer to shop for the supplies than make it.

Portable Ironing Table Tutorial

Supplies needed:

Wooden TV tray (mine came in a set of 4, but I have seen them sold individually as well. I've also seen them at Goodwill--and not thinking, I didn't buy them! Slap on head!)


Electric Staple Gun with staples (or you can use a non-electric staple gun as well--just don't bother with a regular office type stapler, it just won't work!)

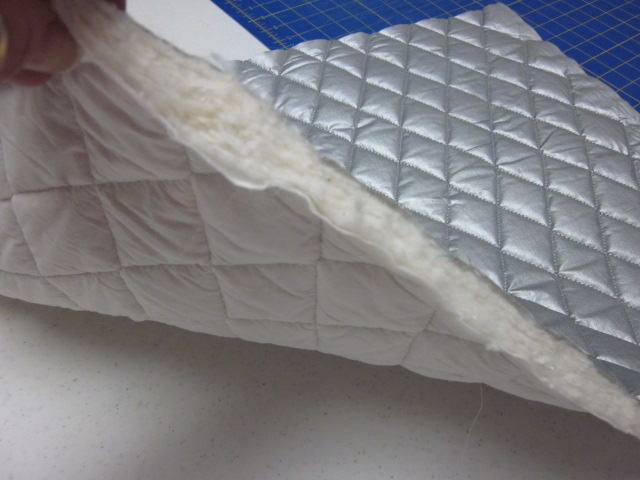
1/2 yard of Insulated Teflon cloth (ironing board cloth that is already layered with thick batting and a lining)  I found mine at the larger JoAnn's ETC stores. If you don't have one nearby, you can order it online or use regular Teflon silver cloth and a few layers of Warm and Natural.


Are you ready?

1. Cut your Teflon cloth about 2.5 to 3" larger on all sides of your wooden TV table.


2. Starting on one side, with the table upside on the wrong side of the cloth, wrap the Teflon cloth around the tray and staple. Staple the entire side. Don't be stingy with the staples. They're cheap.


3. Go to the opposite side of the table and staple that side down.


4. Repeat with the 3rd and 4th sides, leaving the corners for last.


5. Corners: the insulated Teflon cloth is really thick.  I just grabbed the corner that was left standing up and pulled it up tight and stapled. It kind of made it's own pleat. I just made sure that I put more than one staple in the corners.


6. Turn over and enjoy!

Now, wasn't that easy?

Thursday, April 07, 2011

Working on projects

Wow--time gets away so fast anymore.  I used to just chuckle at older people who used to say that and now here I am, saying the very same thing. Does that mean I'm getting old? 
 Must be.

Now that things are looking to slow down, just a tiny bit, I have been itching to get back into my sewing room and getting things done!  I really wanted to cut into some new fabric I bought, but thought I better finish up some older projects. If anything, to assuage my guilt!

I pulled out my Be Attitudes project

that I started oh, in 2009?  this is one of the blocks I got done...

Tuesday, April 05, 2011

New features in Blogger

I'm just testing a few of the new features Blogger has introduced in the past few months and am excited about another new feature coming down the pike. Want a sneak preview?


Hint....


Sunday, April 03, 2011

Mug Rug Mania

How 'bout those mug rugs?  It took me a while, but I finally got a few done and I can see how they can be addicting. But let me tell ya, they do NOT use up any scraps!  It made barely a scratch in the pile.  Guess I could be making these until the cows came home and still wouldn't use up piles of scraps. 

 Here's what I've done so far..


The table runner that never was....I figured I could make a lot of mug rugs from these fussy cut cardinals.


This is my first foray into the selvage world...I've been collecting them ever since I saw what Karen from Selvage Quilts was doing with hers!  Taking baby steps here... now there is nothing that gets thrown in the trash...evah!  It's a sickness I do believe.  

I made another one, but forgot to take a photo. I had a PJ party and we made these and forgot to take those pictures as well.  I'm either hot in taking photos or not. Seems to be no happy medium.  I'm thinking great little gifts, for no reason!

If you are looking for a basic tutorial, Terri at Sew-Fantastic has a great tutorial....and great mug rug. Man, the possibilities are endless.   Look for links to the Flickr pool or other blogs featuring more mug rugs.  The best thing about them, they are done in less than an hour! Woo hoo!

Thursday, March 24, 2011

Everything BUT sewing!

Haven't been sewing nearly as much as I would like. I guess I need to stay home to do that, huh?  LOL  When I am home, it's playing catch up with paper work, house work and other stuff..like taxes. ugh. 


 Which means catching up on bookkeeping. How many others keep on top of it on a regular basis so tax time is a breeze?  I have good intentions, I really do. But then life gets in the way--or better put, there are more fun things in life to do! 


 We are currently re-doing the bathroom upstairs. (I meant to take 'before' pictures--as this was a really dated bathroom, but then got excited that I forgot!)  We completely gutted it, tore out all the walls and started over.(the opening in the back wall will be our small attic access--I'm putting a dresser in front of it). 


 The only thing that remains is the toilet and it was the kind that attaches to the wall and was white, so it could stay.  I've been playing around with the tile design in the shower and here is what I came up with on the back wall of the shower. (The vertical mosaic tile is where the slider bar with the hand held shower goes and the square is the shampoo/soap inset).


The lower half of the wall will be subway tiles, then the cool mosaic tile (which was $628 per box-on sale!  needless to say, I only got one box!),


 then in between the mosaic rows will be 4" white tile..the little squares will really be diamonds as they have 4" tile with a diamond cut out in the center where we will put little mosaic squares.  Above the mosaic tile on top will be another row of subway tile.  As you are looking at this wall, there will be a wall on the left...the same, but with no vertical stripe, and the wall behind you will be a half wall, --where the lower mosaic tile row is will be the height of the wall. 


 We are having a glass wall put on the upper half and then at the diagonal will be a European glass shower door (with no metal).  The shower head wall is 60" and the back half wall is only 40"..so the door will be on the diagonal.  I'm sure this makes no sense to you! LOL  Anyway, that's been consuming some of my time.  We are not actually doing the work, just designing and buying the stuff! 

 We had him put a 'tube' skylight in, it's amazing how much light it brings into a room. This picture was taken on an overcast day, with no other lights on in the room and no flash--and look at the light that comes in!

 There was no window in the bath, so now there is a bit of natural light.  We should be done by Easter, I hope.  At least it's upstairs and out of our way.  When we re-did the laundry room, it was downstairs and a mess!

We removed the door and had a pocket door installed (after we threw the other one away from last year's laundry room remodel--of course!) because I did not want a door slamming against the wall where glass was going to be! 


Now, do yo think I should get back to taxes? LOL  I can get sidetracked SO easily, especially when doing stuff like that.  

Wednesday, March 16, 2011

Scrappy Trip Around the World


Inspired by Bonnie Hunter's (Quiltville) Scrappy TOW, I started one last year and just got around to finishing the top! Sheesh!  It was so easy, why do I wait so long to finish things?  


It's sure bright!  I think it will be a great summer tablecloth!


I only used 12 colors, making 2 different blocks with 6 colors each.

Don't you love the houndstooth in this one?  I sure do..it's so graphic!


I thought I would love the pink zebra stripe a teensy bit better than this. I do like it, but this block wasn't nearly as great as the first one. I think the colors needed a little bit more contrast than what they were. It looked good trying them out!  More quilting knowledge for the future! 

Close up of that great houndstooth!

Finished quilt top--to be put in the growing line up of quilt tops to be finished. 

Thursday, March 10, 2011

Happy Birthday Month to Mia and Liam


Happy 8th Birthday to my Divine Miss M (aka Mia).  She's the cutie in the header. She's a voracious reader and has a HUGE heart for Jesus.  AND she has the most gorgeous, luscious hair I've ever seen on a little girl.  She won't let me have it though.  I asked. 

at Grandparent's Day at her school

Happy 5th Birthday to my little Super Hero, Liam. He's the ornery one in the header.


  I asked him what it meant to be 5, and he said that now he can go to South Carolina with Nana and Papa!  He remembered last year when we picked his older sister up to go and he wasn't very happy. His sister was only too happy to tell him that he had to be FIVE in order to go. So, he's been waiting all this time!  He thinks we should go NOW.  He is the Video Game King!  And is good, it's amazing how smart these little ones are.
                                          doesn't he look like the typical All-American boy?


And Happy 8th Birthday Kai!  He was the cutie in last month's header and then I forgot to mention him. :( Bad Nana!  He is the kindest, tender-hearted little boy. He loves to help his Papa shovel snow and even plow the snow with the quad runner!  He loves all sports and loves being outdoors.

Nana, Kajsa and Kai in Paris

Happy Birthday to all these great kids--grandkids are just the best, aren't they?  One more birthday next month and then we wait until September.

Wednesday, March 02, 2011

Great Quilt Shop in Orlando!

I am in Orlando, with my hubby during our Anniversary week--Happy 36th Kirt!

He's working and I'm playing. Isn't that how it should be?  My friend, Joy, has a second house down here and happened to be here while we were visiting.  I spent a couple days with her and of course, HAD to find a quilt shop, somewhere!  She keeps raving about the closest quilt shop to her.  Guess what?  It IS great.


If you are down visiting Mickey (or Minnie), take time out to head out to The Quilt Place in Rockledge, FL (close to Cocoa Beach--about 40 minutes east of Orlando).

Wow!  That was my first thought when I walked in!  There were quilts hanging over all the fabric bolts,

panels of all kinds were on almost all the walls, numbered for easy reference.  They were individually bagged and hung by number so you could grab what you needed without having to get it cut.  Clever!


Fabric was sorted several ways,  there was a batik wall, drool....


generic fabrics (of sorts) were placed in color groupings,


stripes were together,


dots were together,


Kaffe Fassett and Amy Butler were neighbors


into Florida themed fabric?  All sorts of palm trees, flamingoes, alligators, maps and every other FL themed fabric were all together, making it easy to pull together a FL themed quilt, should you desire.

(sorry--not such a great photo..)

Christmas, holidays, juvenile were among more of the different sections.  I can't even remember all the sections they had.

Patterns were sorted by type and hung on a peg wall.  See a quilt hanging that you love?  Look in the first section of the patterns and it is there. So easy and smart!

Books..omigosh, were there books. A whole huge long row of them, several shelves worth.  I imagine if it's in print, they probably have it, although I didn't check!


Kits? Did I mention kits?  They had TONS of them and several were in the clearance section. One jumped in my arms, as if it needed rescued...what could I say?


Several of my photos did not turn out, as I didn't think to bring a camera with me. I left it at the hotel, thinking we were going to just make a quick quilt shop run.  So I had to resort to my phone camera, so although I took more photos, they didn't always turn out.  

What I didn't get:  the clearance section of fabric, and patterns.  The Long Arm quilting section--WOW!  They had 3 Gammills with Statler Stitchers constantly running.  One employee was in charge of loading the quilts, overseeing them, adding the zippers to load them, and anything related to the quilting of the quilts.  The quilts to be quilted (one facet of their business) hung along 2 walls, moving up the line as quilts were finished. What an operation!

I didn't even see the classroom, the place was too big and too much to see in a few hours! Yes, we were there 2 hours and I felt as if I could have stayed a few more hours.

All I can say is they have something for everyone.  AND they were very friendly!  I'll be back!

Thanks to Teresa, the owner, for allowing me to take photos of her FAN-TAB-U-LOUS store!  And no, I didn't get compensated for saying all this good stuff, I was just being real! :)